
Geniki Taxydromiki API
Complete integration for Geniki Taxydromiki API. Easily connect your store with seamless and robust syncing.
- 5.0.0Version
- 3PHP files

01
What it does
Written for WooCommerce, without third-party ballast: the same behaviour, fewer queries.
Upgrade your WooCommerce experience with our native Geniki Taxydromiki API integration. Enjoy high performance with zero database bloat and native HPOS support. Start managing your store efficiently.
Capabilities
- High Performance Order Storage (HPOS) Ready
- Action Scheduler Asynchronous Syncing
- Full API capabilities & Dashboard reporting
02 — What runs in the background
What the source code actually registers, read from the plugin itself.
- HPOSCompatible with WooCommerce High-Performance Order Storage
- Scheduled tasksUses the WordPress cron for recurring work
- Form safetyEvery submitted form is nonce-checked
- PermissionsEach action checks the user's capabilities (4 checks)
- TranslationEvery string is translatable
Real screen
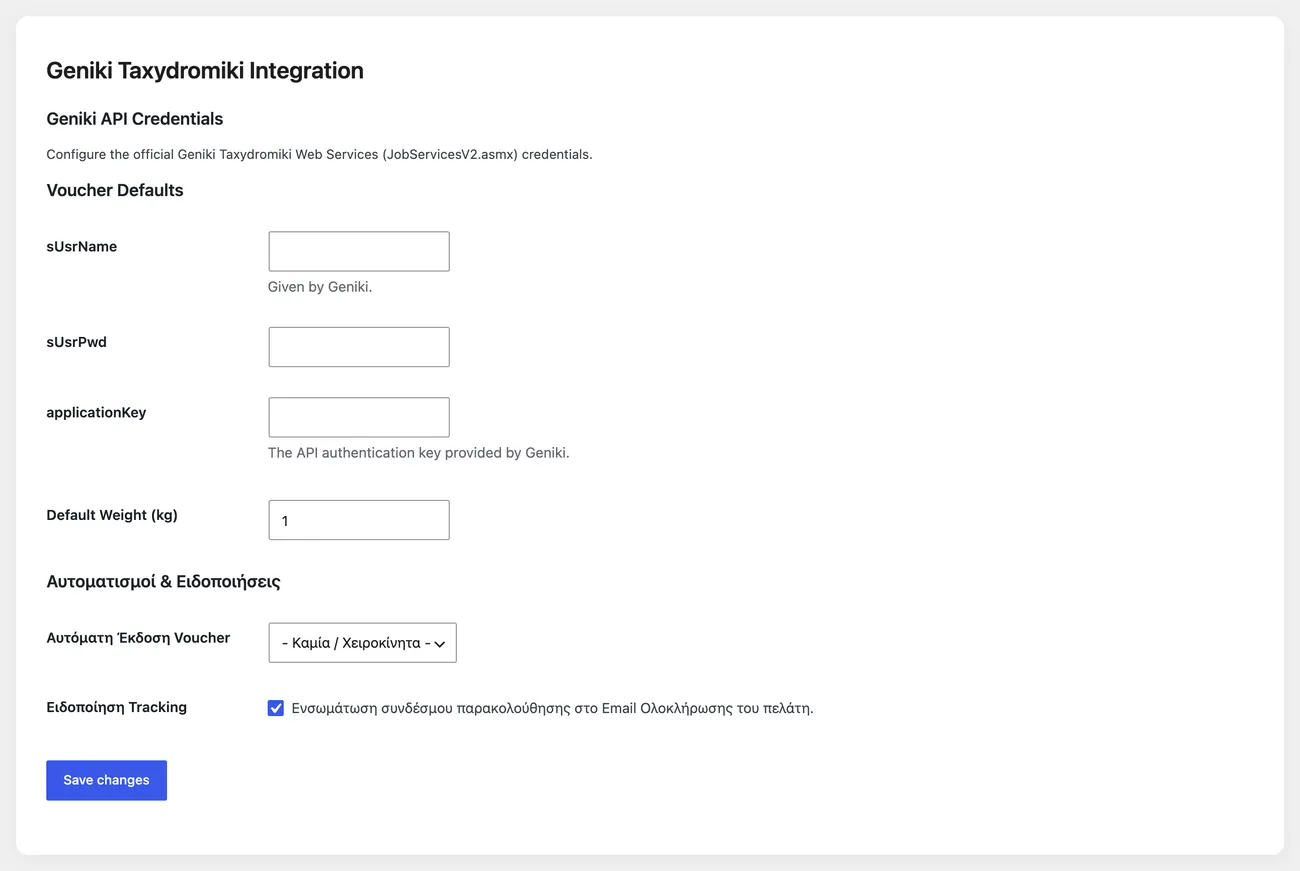
The Geniki Taxydromiki settings
The fields the service asks for, on a single screen with no hidden tabs.
Setup guide
Geniki Taxydromiki covers areas and volumes that are not easy to serve elsewhere, and the plugin talks to it through an API. It creates the shipping label from the order, keeps the tracking number and updates the customer. It is for shops with a contract and active customer codes.
- 1
Get the contract details
Geniki gives you a customer code and a password for the API, together with the service code you are billed under. The customer code sets the price list, so if the shop has several agreements or branches, confirm which code belongs to which dispatch point. Ask for a sample label too, so you can see how it looks before you send one to a customer. Also ask which fields are filled in automatically from the address, because each carrier wants them in its own order.
- 2
Enter the details and enable the shipping method
In the plugin settings enter the customer code, the password and, if it is asked for, the weight used when a product has no weight set. Then enable the shipping method in the shipping zone your contract covers, with the charge you want the customer to pay. Without that second step the method never appears at checkout, whatever you have set up inside the plugin.
- 3
Fill in weights and set up cash on delivery
The cost and the cash on delivery charge come from the weight and from the amount the courier collects. Fill in weights on the products you sell often and make sure the cash on delivery amount is calculated correctly, together with shipping and any extra charges. Test one order with cash on delivery and one prepaid, because the flow is different and the mistake only shows up on the first.
- 4
Test one label from start to print
Place an order with your own email, complete it and create the label from the admin. Check the address, the postcode, the weight, the payment method and the tracking number on the label, then try to look the number up in the Geniki tracking service. If the number is not recognised, the customer code or the service is usually at fault, not the plugin.
- 5
Set up bulk printing
Test bulk printing with three orders and see whether the file comes out as one document and whether the labels fit the paper in your printer. Check whether the shop uses a thermal printer, because then the size and the density change and a wrong setting makes the barcode unreadable. Keep the setting that works, because you will need it again straight away next time.
- 6
Check the updates that go to the customer
Make sure the tracking number appears in the email and on the tracking page, so the customer does not have to phone. Then check whether the plugin updates the order when the parcel is delivered or returned, because an order that was delivered and stays open spoils the shop reports. If the update does not come through, the checks have to be done by hand and you need to decide who does them.
Common mistakes
- Products with no weight. The charge comes out at the minimum and the difference is lost on every order.
- A shipping method that was never added to a zone. The customer never sees it at checkout.
- A test customer code, or one from another branch. The labels are billed to the wrong account.
- A thermal printer label printed on a sheet at reduced size. The barcode cannot be read and the parcel comes back.
More plugins in this category
Questions
About Geniki Taxydromiki API
How many steps does it take to issue a waybill?
One. The waybill is issued from the order page using the details already there, and cancelled from the same place if needed.
Is the customer notified automatically?
Yes, status messages go out automatically if you switch them on. So the customer learns when the parcel is delivered or cancelled.
How does the cash-on-delivery amount get through?
The amount is read from the order and passed to the waybill automatically. You do not type it in by hand.
Can I print several labels at once?
Yes, bulk printing is supported in A4 format and for Zebra printers. The default weight comes from your settings.
What do I need to activate it?
A contract and your Geniki Taxydromiki access credentials. WooCommerce 8.0 or newer is also required.
Licence
Included in the MyWooAIO suite, along with every other plugin, for a single payment.
- Instant 1-click install
- Updates included for life
- Support in Greek
Installation
- Install the MyWooAIO Manager
- Paste your licence key
- One click: the plugin installs and activates itself
- Updates arrive on their own, from the dashboard
Add Geniki Taxydromiki API to your shop
One payment, updates included, no subscription.